

Subscribe to RSS
DOI: 10.1055/s-0044-1789007
Surgical Applied Anatomy of the Direct Anterior Approach Total Hip Arthroplasty: Pearls and Pitfalls during the Learning Curve
Article in several languages: español | EnglishAuthors

Abstract
The Direct Anterior Approach (DAA) has become an increasingly popular choice among orthopedic surgeons for performing total hip arthroplasty (THA). The DAA provides a less invasive means of accessing the hip joint, which has translated to an earlier recovery of function for many patients following THA. Despite its attractiveness, there continues to be concern in the orthopedic community regarding a learning curve for those not formally trained in the use of the DAA. This so-called learning curve has been associated with a period of increased complications such as component malalignment, increased operative blood loss, need for early revision, among others.
Described here is a reproducible step-by-step approach to performing the DAA with the use of a traction table and C-arm fluoroscopy. It is our belief that with a dedicated period of study, careful attention to detail from patient positioning through capsular releases and bone preparation, and a plan for continued learning that many of the aforementioned complications can be avoided during one's practice transition to the use of the DAA for THA.
Introduction
Interest in the direct anterior approach (DAA) for total hip arthroplasty (THA) has risen exponentially over the past two decades as orthopedic surgeons seek to improve clinical outcomes with less invasive surgical techniques.[1] [2] The 2018 American Association of Hip and Knee Surgeons (AAHKS) Annual Meeting Survey reported that 40% of surgeons are using the DAA in THA as part of their practice, which is an increase from 10% in 2009.[2] However, despite its recent growth in popularity, this approach is not new as it dates back to 1881, when initially described by Hueter.[3] This was later followed by Smith-Peterson in 1949[4] and Judet in 1950,[5] and more recently by Light and Keggi[6] specifically for use in THA.
The modern DAA for THA was developed to improve clinical results of minimally invasive THA, and utilizes the internervous and intermuscular plane between the tensor fascia latae and sartorius muscles to allow access to the hip joint without sectioning or releasing the peri-articular hip musculature.[7] This is supported by cadaveric studies which demonstrate less muscle damage to the gluteal musculature in the DAA compared with the mini posterior approach (MPA),[8] as well as a clinical study which reported lower serum markers of inflammation and muscle damage in the post-operative period when comparing the DAA to the posterior approach for THA.[9] Therefore, the DAA may be considered a less-invasive and muscle-preserving approach for THA.
Early data supporting the DAA for THA demonstrated lower post-operative dislocation rates relative to other surgical approaches, however some more recent studies suggest that the rate of instability associated with the DAA is likely similar to other surgical approaches.[10] [11] [12] A very consistent finding across numerous studies has been that patients undergoing DAA THA demonstrate an earlier clinical recovery, decreased post-operative pain, and improved early functional outcomes compared with other surgical approaches that is statistically significant within the first 6 weeks post-operative. Beyond this timeframe, these outcome measures become non-significantly different from more traditional approaches for THA.[13] [14] [15] [16] [17] [18] [19] [20]
A common critique of the DAA for THA is a slightly higher rate of negative outcomes seen with this approach, such as early revisions and early femoral failures,[21] increased blood loss,[13] [22] high rates of lateral femoral cutaneous nerve injury,[22] [23] [24] and longer operative times.[22] [25] A frequently described barrier to the use of the DAA is a steep learning curve for surgeons who have not formally trained on the approach. This learning curve has been well documented in the literature, with some studies noting an increased rate of complications or intraoperative blood loss,[26] [27] while others have described an increase in operative time during the learning curve.[28] The duration of the learning curve has been suggested to be anywhere from 30 to 100 surgical cases, and several authors have described methods for mitigating risk of complications during that period including intensive study/preparation, cadaveric work, surgeon observation, use of intraoperative fluoroscopy, and a plan for continued learning.[26] [27] [28] [29]
In this review, we present a reproducible surgical technique for performing a THA through the DAA using a traction table, with suggestions for mitigating and addressing commonly encountered challenges and tendencies during one's learning curve.
Surgical Technique
Step 1: Patient Positioning and Set-up
-
We describe an “on-table” technique for DAA THA, requiring a specialized table (that attaches to the regular OR table) which allows for manipulation of the operative extremity into positions of traction, internal or external rotation, hip flexion or extension, and abduction or adduction.
-
The operative extremity is secured to the table with a traction boot, and the non-operative extremity is either placed into a well leg holder or another well-padded boot attached to the table in a neutral position with no traction.
-
The position of the non-operative extremity must allow for a C-arm to easily be mobilized in and out of the operative field to obtain AP fluoroscopic images of the hip and pelvis intraoperatively. [[Figs. 1 a, b]]
-
The operative hip should be placed into slight flexion to relax the rectus femoris during exposure, and the leg is in neutral position to slight internal rotation (no more than 15 degrees) without traction.
-
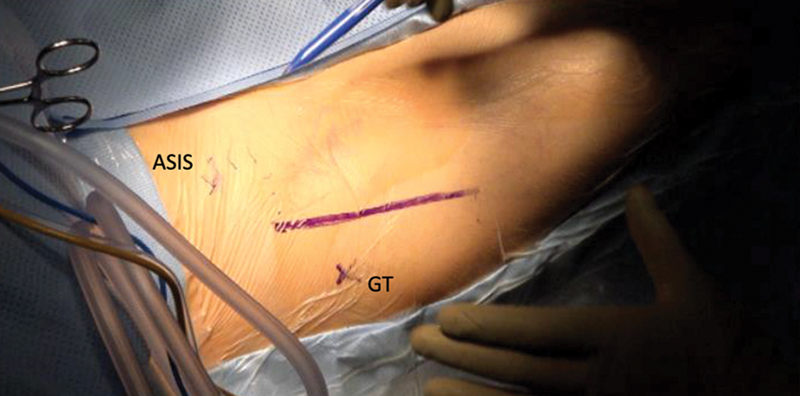
The patient is draped from 5 cm proximal to the anterior superior iliac spine (ASIS) to just above the knee, allowing access to the entire femur. [[Fig. 2]]


Step 2: Incision Placement and Superficial Dissection
-
The ASIS is a critical landmark - the proximal extent of the incision should be 2 cm distal and 3 cm lateral to the ASIS. This starting point should be approximately midway between the ASIS and the tip of the greater trochanter.
-
Next, feel the muscle belly of the tensor fascia latae (TFL). The incision should be 8–10 cm in length and extend over the central portion of the TFL muscle belly. [[Fig. 3]]
-
Following the skin incision, a scalpel or bovie electrocautery is used to dissect through the subcutaneous adipose tissue until the fascia of the TFL is identified. Branches of the lateral femoral cutaneous nerve (LFCN) may occasionally be encountered and are best avoided by ensuring the dissection remains lateral overlying the TFL and does not drift medially while deepening the dissection. If encountered, an attempt is made to sweep the nerve branches medially and enter the TFL fascia more laterally.
-
The fascia of the TFL is incised in line with the skin incision, which should correlate with the direction of the TFL muscle fibers.
-
The anterior edge of the TFL fascia is grasped with an Allis clamp and the tip of the bovie is used to tease the TFL muscle belly away from the overlying fascia.
-
Once the plane between the TFL muscle belly and fascia has been established, use your fingers to bluntly dissect over the anterior aspect of the entire TFL without penetrating the floor of the TFL fascia.
-
Remember that the TFL is a bi-pennate muscle. There is a tendency early in the learning curve to perform the blunt dissection in between the two heads of the TFL – this leads to increased bleeding and damage to the TFL muscle.
-
The muscle belly is retracted laterally, and the rectus femoris should be visible through the floor of the TFL investing fascia. [[Fig. 4]]
-
In very thin patients, avoid bluntly penetrating the fascia over the rectus femoris and mobilizing both the TFL and the rectus laterally – this will put you into the wrong interval and endanger the femoral neurovascular bundle.
-
Place an Adson-Beckmann retractor within the TFL fascia to maintain the TFL muscle belly in a lateral position. The white tendon and red muscle fibers of the rectus muscle and the yellow adipose tissue should be visible through the overlying fascia of the rectus femoris.
-
A slightly curved incision through the fascia overlying the rectus femoris is performed. Releasing the fascia of the vastus lateralis distally and laterally within your incision should be avoided as this will result in the vastus muscle protruding into the surgical field throughout the remainder of the exposure.
-
Sweep the rectus muscle medially and reposition the Adson-Beckmann retractor such that the rectus and TFL are being retracted medially and laterally, respectively.
-
At this point, the ascending branch of the lateral femoral circumflex artery and its accompanying veins are visible through the thin floor of the floor of the rectus fascia. This fascia should be carefully dissected with the bovie until the vessels are clearly visible. A Cobb elevator is then used to clear the fascia and fat from the vessels for a distance of 1–2 cm for cauterization.
-
In addition to the lateral circumflex artery and its two accompanying veins, there are ascending and descending branches laterally and an ascending branch medially. These all should be cauterized with either an Aquamantys or suture ligation. [[Fig. 5]]
-
Once the vessels are cauterized and transected, remove the pericapsular fat pad just proximal to the vessels. This will help to identify the anterior bare area of the hip capsule.
-
A Cobb elevator is used to clear the anterior capsule of any remaining fat and is then positioned over the inferomedial femoral neck. Replace the Cobb with a 45-degree bent Hohmann retractor, and then similarly place another 45-degree bent Hohmann retractor over the superolateral neck. Both retractors are placed in an extra-capsular position.


Step 3: Capsulotomy and Femoral Osteotomy
-
At this point, the leg should be placed into 30 degrees of external rotation without traction to facilitate visualization of the hip capsule.
-
A V-shaped capsulotomy is performed, beginning at the base of the reflected head of the rectus femoris and extending distally along the lateral border of the iliocapsularis until you encounter the retractor over the inferomedial femoral neck. At this point, the capsulotomy is turned ∼60 degrees and continues proximally and laterally along the intertrochanteric line until you encounter the intertrochanteric tubercle. [[Fig. 6]]
-
Following the capsulotomy, both Hohmann retractors over the femoral neck are repositioned to an intracapsular position.
-
A long bovie tip can be used at this point to check and mark a proposed femoral neck osteotomy location using the C-arm. [[Fig. 7]]
-
The leg is placed back into neutral rotation and two turns of fine traction are applied.
-
The femoral neck osteotomy is then made with a saw beginning anterior and lateral and aiming distal medial over the calcar and posteromedial neck. Avoid using the saw to cut the posterior and lateral femoral neck, as this puts the greater trochanter at risk for iatrogenic fracture.
-
After completing the osteotomy, the leg can be placed into 45 degrees of external rotation with the same traction to facilitate removal of the femoral head.
-
The head is removed using a corkscrew. It is often necessary to remove a small portion of the posterior neck and/or osteophytes with a rongeur to reach the posterior capsular attachments that may be tethering the osteotomized femoral head. [[Fig. 8]]


Step 4: Acetabular Preparation and Component Placement
-
Once the head is removed, all retractors are removed and a radiolucent Charnley retractor is properly positioned with a 15-degree caudal tilt.
-
The anterior or medial blade of the retractor is placed deep to the iliocapsularis muscle in the soft spot of the anterior hip capsule, with an ideal location being just outside the labrum in a 4 o'clock position for a right hip (8 o'clock for a left). The posterior blade of the retractor is placed over the capsulotomy flap.
-
A slight release of tight capsular bands of the iliofemoral ligament will allow for additional expansion of the Charnley retractor.
-
The leg is then placed into slight internal rotation (30 degrees) and the anterior and posterior labrum, as well as the pulvinar are excised.
-
The leg is placed into neutral rotation and the acetabulum is reamed in ∼40 degrees of abduction and 20 degrees of anteversion, or according to the pre-operative plan. [[Fig. 9]]
-
Impact the acetabular component into final position and check with fluoroscopy, then place screws as needed to be followed by placement of the final polyethelene liner.

Step 5: Femoral Preparation and Component Placement
-
The leg is externally rotated to 90 degrees to begin the capsular releases for femoral mobilization.
-
First, the pubofemoral ligament should be released along the calcar until the lesser trochanter is palpable.
-
Next, release the ischiofemoral ligament ∼1 cm lateral to the acetabulum. This is done by bending the bovie tip 90 degrees and releasing the capsule and soft tissues parallel to the acetabular cup, extending along the greater trochanter down into the piriformis fossa. This release is complete when posterior capsular fat is visualized.
Check the adequacy of the release at this point by placing a bone hook into the femoral canal along the medial neck and pulling laterally and anteriorly (this is a composite maneuver). The femur should deliver into the wound, with the greater trochanter clearing the posterior wall of the acetabulum. If mobilization is inadequate, continue the release initially at the level of the piriformis fossa. If needed, the piriformis tendon can also be released. [[Figs. 10 a, b, c]]

-
With the bone hook in the femoral canal and pulling laterally and anteriorly, the leg is brought into extension with traction released.
-
External rotation is then maxed to 130–150 degrees once the leg is in extension, and then the operative extremity can be adducted.
-
Two additional retractors are then placed to expose the femur for preparation - a Müeller retractor is placed over the medial calcar, and a double angled Hohmann retractor is placed piercing the gluteus medius muscle and capsule over the greater trochanter.
-
A box osteotome or curette is used to enter the canal, and the starting point should be corroborated with the frog-leg lateral femoral X-ray. Typically, the starting point is slightly posterior and lateral to engage the canal and femoral bow properly.
-
Hard cortical bone laterally can be removed with a rongeur, curette or high-speed burr.
-
When broaching, offset broach handles should be used and alignment of the broach should be co-planar with the posterior cortex of the femoral neck. The tendency is to perforate the femoral cortex laterally or posteriorly. [[Fig. 11]]
-
Once broaching is complete, the trial neck and head are placed, and the hip is reduced.
-
Anterior hip stability is assessed with hip extension and external rotation, and fluoroscopy is used to assess component position and leg length based on restoration of Shenton's Line. Of note, posterior hip stability is not able to be assessed intraoperatively with use of the traction table.
-
Trial implants are removed, and final implants are impacted into position.
-
The hip is once again reduced, and C-arm fluoroscopy can be used to assess final component position.

Step 6: Wound Closure and Rehab
-
The fascia of the TFL is closed, either with an interrupted #1 Vicryl or running barbed suture first. It is important to take small bites of fascial tissue medially, as there is a risk of injuring small lateral femoral cutaneous nerve branches. The dermal and subcuticular closure is performed in standard fashion, with application of a surgical skin glue prior to placement of an occlusive dressing after the glue has adequately dried.
-
The patient is made weight-bearing as tolerated (WBAT) postoperatively and allowed to ambulate with a walker for 2 weeks without any post-operative hip precautions.
Common Challenges
-
Pannus management
-
○ The skin folds of a patient's pannus should be evaluated preoperatively to assess for any skin breakdown, open sores, or fungal infection. If there is acceptable skin quality, the pannus can be gently retracted away from the planned incision using multiple strips of 2–3-inch silk tape on the abdomen secured to the opposite side of the operating room table. Ensure that no iatrogenic skin tearing occurs during this process. [[Fig. 12]]
-
-
Muscular patients and difficult femoral exposure
-
○ Muscular patients can present a challenge with surgical exposure through the DAA. Increasing the obliquity of the skin incision can help to decrease the impact of a larger TFL on the acetabular exposure and reaming. Additionally, it can be helpful to release the indirect head of the rectus femoris muscle from the anterior acetabular rim to enhance visualization.
-
○ With a tight femur, it is important to assist with the leg's external rotation manually through the thigh rather than merely through the traction boot. Be thorough with the femoral releases as described above before taking the leg down into extension to avoid fracturing the greater trochanter. The table can also be placed into slight trendelenberg position to allow for greater extension through the hip to improve femoral position for broaching.
-
-
Acetabular reaming
-
○ The anterior skin incision and tension from the retracted TFL will have a tendency to cause levering during acetabular reaming, which may result in over reaming of the anterior wall. These same structures can lead to placing the final acetabular component in excessive anteversion. Being cognizant of these tendencies, ensure a posterior directed force during reaming. We also recommend the use of C-arm fluoroscopy to verify reamer and cup position intraoperatively.
-
○ If additional visualization is needed for acetabular preparation and reaming, there are 3 capsulolabral retractor positions that can be used. One is intracapsular and extralabral at the anterosuperior acetabulum (perpendicular to the ilioinguinal ligament), one similarly placed at the posterolateral acetabulum, and a third retractor placed inferior to the transverse acetabular ligament (TAL). [[Fig. 13]]
-
-
Femoral fracture
-
○ If the greater trochanter is fractured, this can be left untreated with minimal risk of further displacement and proximal trochanteric escape. The patient should avoid active abduction exercises postoperatively, but it is not imperative to protect the patient's weightbearing.
-
○ A fracture of the calcar can be treated with a 3.5 mm lag screw from anterior to posterior if the fracture is short and longitudinal, followed by insertion of the same sized stem. The patient is made touchdown weight-bearing.
-
○ A fracture of the calcar that is oblique or extends further can be treated with a cable above and below the lesser trochanter. The leg is internally rotated to define the interval between the vastus lateralis origin and the gluteus minimus insertion. The vastus origin is slightly elevated, and a cable is placed deep to the vastus lateralis and superficial to the gluteus medius insertion. The leg is then externally rotated to pass the cable proximal to the lesser trochanter. The same sized stem can be inserted, and the patient is made touchdown weightbearing.
-
○ If the femoral shaft is fractured, the skin incision should be extended posteriorly and distally. A second working window can be created by elevating the vastus lateralis from the lateral intermuscular septum, giving you direct access to the femoral shaft for additional cable placement. In this case, a stem that is 1 size larger or changing the stem to a diaphyseal engaging stem can be used, and the patient is made touchdown weightbearing.
-


Summary
Surgeon adoption of the DAA for THA has grown significantly in recent years, and at present it is among the most widely used approaches for primary THA in the United States and globally.[1] [2] [30] [31] The use of an internervous and intermuscular dissection plane, decreased muscle and soft-tissue damage, decreased hospital length of stay, and improved early recovery of function are several of the purported reasons for the growing popularity of the DAA.[7] [9] [14] [15] [17] [18] [22] [32]
A common concern among surgeons considering a transition to this approach for THA is a learning curve that has been associated with issues such as increased operative blood loss, component malpositioning, or need for early revision.[19] [26] [29] [31] As with any significant change in practice, there is a learning period associated with the DAA that has been described as taking anywhere from 30 to 100 surgical cases before complication rates normalize to what had been encountered in one's pre-transition practice.[19] [26] [28] [31] The senior author has previously published data on his own practice transition and learning curve from a mini-posterior approach THA to the DAA THA, and continues to recommend implementation of a well-thought-out strategic learning plan prior to engaging in a transition to using the DAA for THA.[28]
Here, we have described a step-by-step approach to performing a DAA THA. With a dedicated learning plan and careful attention to detail from patient positioning to capsular releases and femoral exposure, many of the commonly reported complications such as malpositioned or undersized components, iatrogenic fracture, or increased operative blood loss can be largely avoided. The senior author has been using this DAA technique in practice for over five years and the DAA represent over 70% of his primary THA practice. The DAA THA can be performed safely and reproducibly and is also conducive to teaching orthopedic surgery residents and fellows in training.
Conflicto de intereses
Ninguno.
-
Referencias
- 1 Patel NN, Shah JA, Erens GA. Current Trends in Clinical Practice for the Direct Anterior Approach Total Hip Arthroplasty. J Arthroplasty 2019; 34 (09) 1987-1993.e3
- 2 Yakkanti RR, Sedani A, Greif DN, Yakkanti R, Massel DH, Hernandez VH. A Bibliometric Analysis of the 50 Most Commonly Cited Studies of the Direct Anterior Approach in Total Hip Arthroplasty. Adv Orthop 2022; 2022: 1974090
- 3 Rachbauer F, Kain MS, Leunig M. The history of the anterior approach to the hip. Orthop Clin North Am 2009; 40 (03) 311-320
- 4 Smith-Petersen MN. Approach to and exposure of the hip joint for mold arthroplasty. J Bone Joint Surg Am 1949; 31A (01) 40-46
- 5 Judet J, Judet R. The use of an artificial femoral head for arthroplasty of the hip joint. J Bone Joint Surg Br 1950; 32-B (02) 166-173
- 6 Light TR, Keggi KJ. Anterior approach to hip arthroplasty. Clin Orthop Relat Res 1980; (152) 255-260
- 7 Siguier T, Siguier M, Brumpt B. Mini-incision anterior approach does not increase dislocation rate: a study of 1037 total hip replacements. Clin Orthop Relat Res 2004; (426) 164-173
- 8 Meneghini RM, Pagnano MW, Trousdale RT, Hozack WJ. Muscle damage during MIS total hip arthroplasty: Smith-Petersen versus posterior approach. Clin Orthop Relat Res 2006; 453 (453) 293-298
- 9 Bergin PF, Doppelt JD, Kephart CJ. et al. Comparison of minimally invasive direct anterior versus posterior total hip arthroplasty based on inflammation and muscle damage markers. J Bone Joint Surg Am 2011; 93 (15) 1392-1398
- 10 Sheth D, Cafri G, Inacio MC, Paxton EW, Namba RS. Anterior and Anterolateral Approaches for THA Are Associated With Lower Dislocation Risk Without Higher Revision Risk. Clin Orthop Relat Res 2015; 473 (11) 3401-3408
- 11 Restrepo C, Mortazavi SM, Brothers J, Parvizi J, Rothman RH. Hip dislocation: are hip precautions necessary in anterior approaches?. Clin Orthop Relat Res 2011; 469 (02) 417-422
- 12 Aggarwal VK, Elbuluk A, Dundon J. et al. Surgical approach significantly affects the complication rates associated with total hip arthroplasty. Bone Joint J 2019; 101-B (06) 646-651
- 13 Nakata K, Nishikawa M, Yamamoto K, Hirota S, Yoshikawa H. A clinical comparative study of the direct anterior with mini-posterior approach: two consecutive series. J Arthroplasty 2009; 24 (05) 698-704
- 14 Wang Z, Hou JZ, Wu CH. et al. A systematic review and meta-analysis of direct anterior approach versus posterior approach in total hip arthroplasty. J Orthop Surg Res 2018; 13 (01) 229
- 15 Restrepo C, Parvizi J, Pour AE, Hozack WJ. Prospective randomized study of two surgical approaches for total hip arthroplasty. J Arthroplasty 2010; 25 (05) 671-9.e1
- 16 Barrett WP, Turner SE, Murphy JA, Flener JL, Alton TB. Prospective, Randomized Study of Direct Anterior Approach vs Posterolateral Approach Total Hip Arthroplasty: A Concise 5-Year Follow-Up Evaluation. J Arthroplasty 2019; 34 (06) 1139-1142
- 17 Berend KR, Lombardi Jr AV, Seng BE, Adams JB. Enhanced early outcomes with the anterior supine intermuscular approach in primary total hip arthroplasty. J Bone Joint Surg Am 2009; 91 (Suppl. 06) 107-120
- 18 Parvizi J, Restrepo C, Maltenfort MG. Total Hip Arthroplasty Performed Through Direct Anterior Approach Provides Superior Early Outcome: Results of a Randomized, Prospective Study. Orthop Clin North Am 2016; 47 (03) 497-504
- 19 den Hartog YM, Mathijssen NM, Vehmeijer SB. The less invasive anterior approach for total hip arthroplasty: a comparison to other approaches and an evaluation of the learning curve - a systematic review. Hip Int 2016; 26 (02) 105-120
- 20 Meermans G, Konan S, Das R, Volpin A, Haddad FS. The direct anterior approach in total hip arthroplasty: a systematic review of the literature. Bone Joint J 2017; 99-B (06) 732-740
- 21 Meneghini RM, Elston AS, Chen AF, Kheir MM, Fehring TK, Springer BD. Direct Anterior Approach: Risk Factor for Early Femoral Failure of Cementless Total Hip Arthroplasty: A Multicenter Study. J Bone Joint Surg Am 2017; 99 (02) 99-105
- 22 Cheng TE, Wallis JA, Taylor NF. et al. A Prospective Randomized Clinical Trial in Total Hip Arthroplasty-Comparing Early Results Between the Direct Anterior Approach and the Posterior Approach. J Arthroplasty 2017; 32 (03) 883-890
- 23 Nambiar M, Cheng TE, Onggo JR. et al. No Difference in Functional, Radiographic, and Survivorship Outcomes Between Direct Anterior or Posterior Approach THA: 5-Year Results of a Randomized Trial. Clin Orthop Relat Res 2021; 479 (12) 2621-2629
- 24 Ozaki Y, Homma Y, Baba T, Sano K, Desroches A, Kaneko K. Spontaneous healing of lateral femoral cutaneous nerve injury and improved quality of life after total hip arthroplasty via a direct anterior approach. J Orthop Surg (Hong Kong) 2017; 25 (01) 2309499016684750
- 25 Poehling-Monaghan KL, Kamath AF, Taunton MJ, Pagnano MW. Direct anterior versus miniposterior THA with the same advanced perioperative protocols: surprising early clinical results. Clin Orthop Relat Res 2015; 473 (02) 623-631
- 26 Zawadsky MW, Paulus MC, Murray PJ, Johansen MA. Early outcome comparison between the direct anterior approach and the mini-incision posterior approach for primary total hip arthroplasty: 150 consecutive cases. J Arthroplasty 2014; 29 (06) 1256-1260
- 27 Seng BE, Berend KR, Ajluni AF, Lombardi Jr AV. Anterior-supine minimally invasive total hip arthroplasty: defining the learning curve. Orthop Clin North Am 2009; 40 (03) 343-350
- 28 Pirruccio K, Evangelista PJ, Haw J, Goldberg T, Sheth NP. Safely Implementing the Direct Anterior Total Hip Arthroplasty: A Methodological Approach to Minimizing the Learning Curve. J Am Acad Orthop Surg 2020; 28 (22) 930-936
- 29 Hamilton WG, Parks NL, Huynh C. Comparison of Cup Alignment, Jump Distance, and Complications in Consecutive Series of Anterior Approach and Posterior Approach Total Hip Arthroplasty. J Arthroplasty 2015; 30 (11) 1959-1962
- 30 Post ZD, Orozco F, Diaz-Ledezma C, Hozack WJ, Ong A. Direct anterior approach for total hip arthroplasty: indications, technique, and results. J Am Acad Orthop Surg 2014; 22 (09) 595-603
- 31 Peters RM, Ten Have BLEF, Rykov K. et al. The learning curve of the direct anterior approach is 100 cases: an analysis based on 15,875 total hip arthroplasties in the Dutch Arthroplasty Register. Acta Orthop 2022; 93: 775-782
- 32 Taunton MJ, Trousdale RT, Sierra RJ, Kaufman K, Pagnano MW. John Charnley Award: Randomized Clinical Trial of Direct Anterior and Miniposterior Approach THA: Which Provides Better Functional Recovery?. Clin Orthop Relat Res 2018; 476 (02) 216-229
Address for correspondence
Publication History
Received: 04 February 2023
Accepted: 18 June 2024
Article published online:
26 August 2024
© 2024. Sociedad Chilena de Ortopedia y Traumatologia. This is an open access article published by Thieme under the terms of the Creative Commons Attribution-NonDerivative-NonCommercial License, permitting copying and reproduction so long as the original work is given appropriate credit. Contents may not be used for commercial purposes, or adapted, remixed, transformed or built upon. (https://creativecommons.org/licenses/by-nc-nd/4.0/)
Thieme Revinter Publicações Ltda.
Rua do Matoso 170, Rio de Janeiro, RJ, CEP 20270-135, Brazil
-
Referencias
- 1 Patel NN, Shah JA, Erens GA. Current Trends in Clinical Practice for the Direct Anterior Approach Total Hip Arthroplasty. J Arthroplasty 2019; 34 (09) 1987-1993.e3
- 2 Yakkanti RR, Sedani A, Greif DN, Yakkanti R, Massel DH, Hernandez VH. A Bibliometric Analysis of the 50 Most Commonly Cited Studies of the Direct Anterior Approach in Total Hip Arthroplasty. Adv Orthop 2022; 2022: 1974090
- 3 Rachbauer F, Kain MS, Leunig M. The history of the anterior approach to the hip. Orthop Clin North Am 2009; 40 (03) 311-320
- 4 Smith-Petersen MN. Approach to and exposure of the hip joint for mold arthroplasty. J Bone Joint Surg Am 1949; 31A (01) 40-46
- 5 Judet J, Judet R. The use of an artificial femoral head for arthroplasty of the hip joint. J Bone Joint Surg Br 1950; 32-B (02) 166-173
- 6 Light TR, Keggi KJ. Anterior approach to hip arthroplasty. Clin Orthop Relat Res 1980; (152) 255-260
- 7 Siguier T, Siguier M, Brumpt B. Mini-incision anterior approach does not increase dislocation rate: a study of 1037 total hip replacements. Clin Orthop Relat Res 2004; (426) 164-173
- 8 Meneghini RM, Pagnano MW, Trousdale RT, Hozack WJ. Muscle damage during MIS total hip arthroplasty: Smith-Petersen versus posterior approach. Clin Orthop Relat Res 2006; 453 (453) 293-298
- 9 Bergin PF, Doppelt JD, Kephart CJ. et al. Comparison of minimally invasive direct anterior versus posterior total hip arthroplasty based on inflammation and muscle damage markers. J Bone Joint Surg Am 2011; 93 (15) 1392-1398
- 10 Sheth D, Cafri G, Inacio MC, Paxton EW, Namba RS. Anterior and Anterolateral Approaches for THA Are Associated With Lower Dislocation Risk Without Higher Revision Risk. Clin Orthop Relat Res 2015; 473 (11) 3401-3408
- 11 Restrepo C, Mortazavi SM, Brothers J, Parvizi J, Rothman RH. Hip dislocation: are hip precautions necessary in anterior approaches?. Clin Orthop Relat Res 2011; 469 (02) 417-422
- 12 Aggarwal VK, Elbuluk A, Dundon J. et al. Surgical approach significantly affects the complication rates associated with total hip arthroplasty. Bone Joint J 2019; 101-B (06) 646-651
- 13 Nakata K, Nishikawa M, Yamamoto K, Hirota S, Yoshikawa H. A clinical comparative study of the direct anterior with mini-posterior approach: two consecutive series. J Arthroplasty 2009; 24 (05) 698-704
- 14 Wang Z, Hou JZ, Wu CH. et al. A systematic review and meta-analysis of direct anterior approach versus posterior approach in total hip arthroplasty. J Orthop Surg Res 2018; 13 (01) 229
- 15 Restrepo C, Parvizi J, Pour AE, Hozack WJ. Prospective randomized study of two surgical approaches for total hip arthroplasty. J Arthroplasty 2010; 25 (05) 671-9.e1
- 16 Barrett WP, Turner SE, Murphy JA, Flener JL, Alton TB. Prospective, Randomized Study of Direct Anterior Approach vs Posterolateral Approach Total Hip Arthroplasty: A Concise 5-Year Follow-Up Evaluation. J Arthroplasty 2019; 34 (06) 1139-1142
- 17 Berend KR, Lombardi Jr AV, Seng BE, Adams JB. Enhanced early outcomes with the anterior supine intermuscular approach in primary total hip arthroplasty. J Bone Joint Surg Am 2009; 91 (Suppl. 06) 107-120
- 18 Parvizi J, Restrepo C, Maltenfort MG. Total Hip Arthroplasty Performed Through Direct Anterior Approach Provides Superior Early Outcome: Results of a Randomized, Prospective Study. Orthop Clin North Am 2016; 47 (03) 497-504
- 19 den Hartog YM, Mathijssen NM, Vehmeijer SB. The less invasive anterior approach for total hip arthroplasty: a comparison to other approaches and an evaluation of the learning curve - a systematic review. Hip Int 2016; 26 (02) 105-120
- 20 Meermans G, Konan S, Das R, Volpin A, Haddad FS. The direct anterior approach in total hip arthroplasty: a systematic review of the literature. Bone Joint J 2017; 99-B (06) 732-740
- 21 Meneghini RM, Elston AS, Chen AF, Kheir MM, Fehring TK, Springer BD. Direct Anterior Approach: Risk Factor for Early Femoral Failure of Cementless Total Hip Arthroplasty: A Multicenter Study. J Bone Joint Surg Am 2017; 99 (02) 99-105
- 22 Cheng TE, Wallis JA, Taylor NF. et al. A Prospective Randomized Clinical Trial in Total Hip Arthroplasty-Comparing Early Results Between the Direct Anterior Approach and the Posterior Approach. J Arthroplasty 2017; 32 (03) 883-890
- 23 Nambiar M, Cheng TE, Onggo JR. et al. No Difference in Functional, Radiographic, and Survivorship Outcomes Between Direct Anterior or Posterior Approach THA: 5-Year Results of a Randomized Trial. Clin Orthop Relat Res 2021; 479 (12) 2621-2629
- 24 Ozaki Y, Homma Y, Baba T, Sano K, Desroches A, Kaneko K. Spontaneous healing of lateral femoral cutaneous nerve injury and improved quality of life after total hip arthroplasty via a direct anterior approach. J Orthop Surg (Hong Kong) 2017; 25 (01) 2309499016684750
- 25 Poehling-Monaghan KL, Kamath AF, Taunton MJ, Pagnano MW. Direct anterior versus miniposterior THA with the same advanced perioperative protocols: surprising early clinical results. Clin Orthop Relat Res 2015; 473 (02) 623-631
- 26 Zawadsky MW, Paulus MC, Murray PJ, Johansen MA. Early outcome comparison between the direct anterior approach and the mini-incision posterior approach for primary total hip arthroplasty: 150 consecutive cases. J Arthroplasty 2014; 29 (06) 1256-1260
- 27 Seng BE, Berend KR, Ajluni AF, Lombardi Jr AV. Anterior-supine minimally invasive total hip arthroplasty: defining the learning curve. Orthop Clin North Am 2009; 40 (03) 343-350
- 28 Pirruccio K, Evangelista PJ, Haw J, Goldberg T, Sheth NP. Safely Implementing the Direct Anterior Total Hip Arthroplasty: A Methodological Approach to Minimizing the Learning Curve. J Am Acad Orthop Surg 2020; 28 (22) 930-936
- 29 Hamilton WG, Parks NL, Huynh C. Comparison of Cup Alignment, Jump Distance, and Complications in Consecutive Series of Anterior Approach and Posterior Approach Total Hip Arthroplasty. J Arthroplasty 2015; 30 (11) 1959-1962
- 30 Post ZD, Orozco F, Diaz-Ledezma C, Hozack WJ, Ong A. Direct anterior approach for total hip arthroplasty: indications, technique, and results. J Am Acad Orthop Surg 2014; 22 (09) 595-603
- 31 Peters RM, Ten Have BLEF, Rykov K. et al. The learning curve of the direct anterior approach is 100 cases: an analysis based on 15,875 total hip arthroplasties in the Dutch Arthroplasty Register. Acta Orthop 2022; 93: 775-782
- 32 Taunton MJ, Trousdale RT, Sierra RJ, Kaufman K, Pagnano MW. John Charnley Award: Randomized Clinical Trial of Direct Anterior and Miniposterior Approach THA: Which Provides Better Functional Recovery?. Clin Orthop Relat Res 2018; 476 (02) 216-229


